
Aquarium background is one of the most significant factors that directly affect the behavior and color of your fish. So, setting a background on two or three sides of your aquarium is recommended. It reduces the chance of your fish seeing their own reflection and being stressed while adding extra beauty to your fish tank.
How can I make my own fish tank background?
In practice, there are many ways to build your own aquarium backgrounds for your fish tanks using different materials. But most of them are not last long and are not realistic.
Here we will show you how to build an ultra-realistic 3D rock background for your aquarium. It will be a great method if you work on a tight budget.
How do you make a 3d Aquarium Background for your fish tank?
Let`s see how to make a 3D rock background for your aquarium using styrofoam and concrete step by step. Also, we have attached a fully described video by SerpaDesigns, to demonstrate how to make one for yourself.
This is a tried-and-true method that people have been doing for quite a while. You don’t need a lot of materials for this build, and in effect, you can inexpensively make a decent-looking 3D background for your fish tank.
Material List for the DIY Aquarium Background
- Styrofoam sheets
- Cement
- Sand aggregates
- Silicone Glue
- Glue gun
Sizing the Styrofoam for Aquarium Background
Start out with a piece of foam. It’s better to find styrofoam with a thickness of about 3 inches. Because then you can craft all the caves within the single foam.
But if there are no styrofoam sheets with a 3-inch thickness, you can use standard craft styrofoam around an inch thick for the base piece of foam and glue 3 styrofoams together. You can use Silicone or a glue gun to paste styrofoam sheets together to form the rocky 3D background. Also, you can use toothpicks to strengthen the base foam as shown in the video.
First, measure the width and height of the enclosure. After taking each measurement, mark the foam to create the base outline of the background. However, make it slightly smaller to accommodate the thickness of the concrete, which will be applied later.
After marking the margins, the next step is to cut the base styrofoam for the aquarium background. Simply you can use a knife or a hot knife which is pretty efficient at cutting styrofoam.
Once the foam is cut accordingly, place it into your aquarium to see whether it fits properly. You want it to be a somewhat loose fit overall. Then with the main piece of foam cut to size, let’s move on to the next step.
Forming the basic Structure of the Aquarium Background
Depending on your vision or limitations, you can carve this background to look however you want. It’s better to check out some aquarium backgrounds with different rock formations on the internet and try to replicate something you like.
It’s better to sketch some formations onto the foam before doing anything else. This sketch doesn’t have to be perfect. It’s only going to serve as a reference. With the completed sketch, we’re ready to start making the rocks themselves.
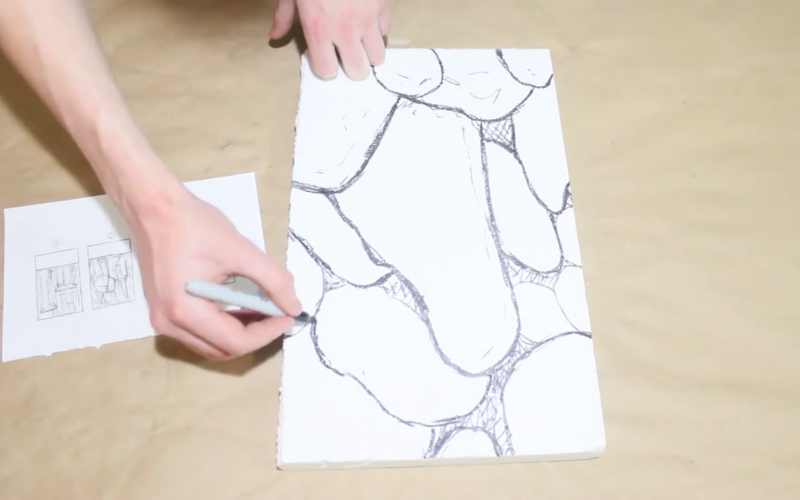
At this stage, the foam doesn’t need to be perfectly carved. We’re simply trying to get the base formation down. Afterward, we will carve it out and make it look proper.
There’s something very significant to keep in mind. We will cover this foam with a concrete layer, which will remove a lot of the detailed work we carve. So when carving, try to over-exaggerate everything to compensate for the loss of detail. Then the end result will still be pretty detailed and somewhat realistic.
It is also good to rough up the surface of the foam as much as possible. It will allow the concrete to better stick to the foam structure.
Cement Painting on the Formed Background Structure
Next up, you’re gonna need to get some cement. It`s better to use hydraulic cement. Because it’s meant to be used in areas with a lot of moisture, that’s perfect for our intended purpose: an aquarium background.
You’ll also need a mixing bucket, a paintbrush, and a face mask. We use the mixing bucket for obvious reasons, the brush to apply the concrete, and a mask to avoid inhaling any particulates.
Start by pouring out some of the cement into your mixing bowl. Next, pour in some water and mix it well as a concentrated solution. If it is too runny, you can add some cement to compensate.
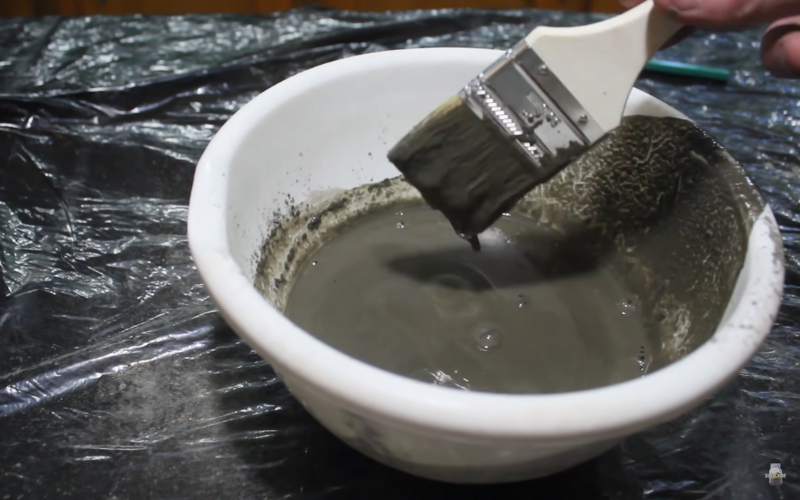
Once you’ve made a suitable mixture, begin painting a thin layer onto the foam structure. We should mix it so thin for the initial layer to get down into all the crooks and crannies.
Since it’s so runny, some of the foam will inevitably show through. Don’t worry; this will get covered in just a moment with the next layers. Allow this layer of cement to dry until it turns very light in color.
After that, we will mix up some concrete for the next layer. Start by adding the aggregate. The aggregate will add texture to the surface and make the structure stronger.
You can use different colors of sand. But it’s better to use black colored sand to look realistic for the aquarium background. You could also use some fine gravel for a rocky 3D background.
After choosing the aggregate, dump some cement and gradually mix it in the water. You want this mixture to be much thicker than the first while still being somewhat runny.

Then simply paint it onto the background like before. It won’t be as easy this time because it’s thicker. But do your best to get every surface covered. Just like before, allow the aquarium background to dry until it becomes much lighter in color.
Then we’ll mix up the third and final batch of concrete. Add some cement, a significant amount of sand, and then the water. I recommend using some more aggregate. So that you can get some nice texture in your aquarium background. Finally, let the background dry.
Placing in the Aquarium
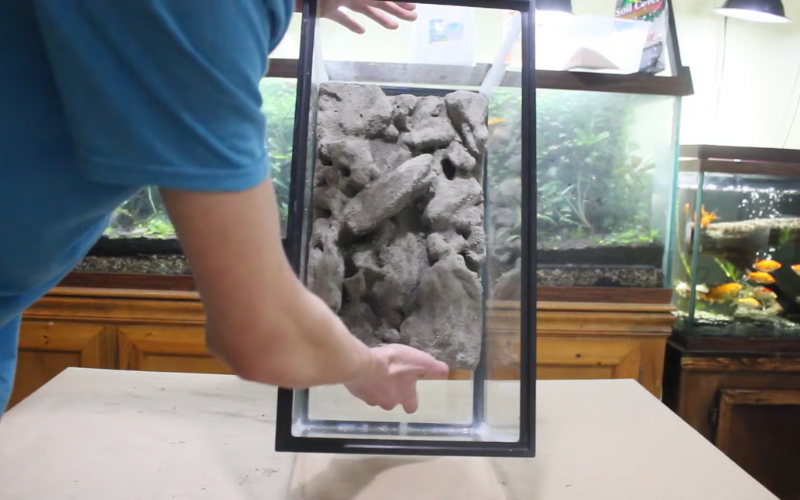
Now you will see that most of the detailed work you carved out earlier is pretty much gone. We can finally put it into the tank enclosure. Before doing so, ensure the back of the aquarium background is as clean as possible. So that it sticks to the glass optimally.
After determining that the background fits in place, let’s apply some silicone to paste the 3D background into the fish tank. Simply squirt a generous amount of silicone all over the back of the aquarium. I recommend cleaning the glass prior with some rubbing alcohol. It will ensure that the silicone adheres firmly to both surfaces.
Then place the background onto the silicone and move back and forth if possible. This will help the silicone be distributed a little better. Now we’re done with our DIY aquarium background. Just let the silicone cure for 24 hours before proceeding.
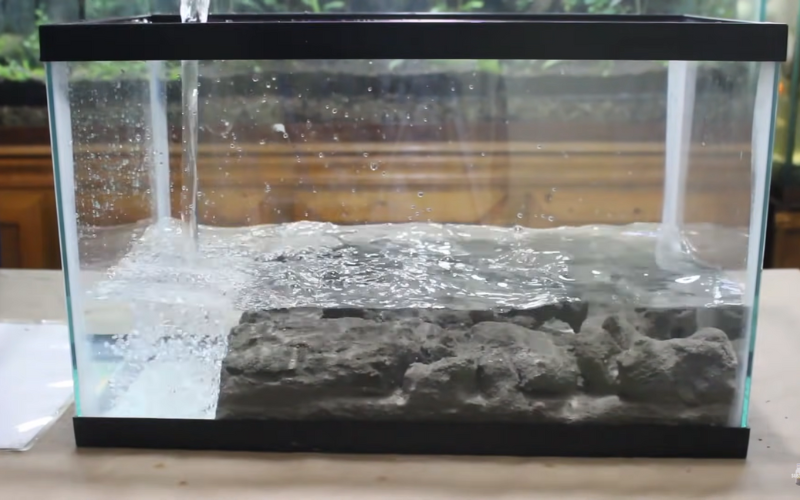
Before using the aquarium background in your fish tank, you will need to soak it well. Otherwise, it will raise the pH level. So, perform water changes on your aquarium until the pH has evened. The thickness of your concrete will dictate how long this takes.
Final Words
Finally, you will end up with an amazing aquarium background. This DIY aquarium background method is pretty easy to pull off and is extremely cheap compared to the other concrete backgrounds. Once aged, this background will look pretty realistic with the little algae or moss.
This versatile method can be used to make not exclusively for backgrounds but also for other decorations. If you love to learn more about DIY aquariums, check out our DIY Aquarium section.

